Introduction

OpsRamp supports the installation of a collector in both virtualized and cloud-native environments. The installation process in both environments is achieved in a single unified flow as shown below.

Install a collector

Follow these steps to install a collector:

  1. Navigate to Setup > Account. The Account Details page is displayed.

  2. Click the Collector Profiles tile. The Collector Profiles page is displayed.

  3. Click +Add.

  4. Enter following details in the gateway collector profile page:

    • Enter a profile name
    • Provide the short description (Optional)
    • Select a profile type
  5. Select one of the collector from below as per your requirement:

    • Amazom Machine Image
    • Virtual Appliance (ISO)
    • Virtual Appliance (OVA)
    • Azure Blob Container
    • Google Image
    • Virtual Appliance (ISO) - NextGen
    • Virtual Appliance (OVA) - NextGen
    • Cloud-Native Application (Installer) - NextGen
    • Installer for Windows OS
  6. Click Next.

  7. Download the required file.

  8. Follow the instructions to install and register the Gateway Collector.

  9. Click Finish. The gateway is added to the collector profile.

See Classic Gateways and NextGen Gateways for more information on installing a gateway.

After creating the collector profile and installing the gateway and registering it, you can see all the available collector profiles in the Collector Profiles listing page.

The Collector Profiles listing page consists of the following columns:

ColumnDescription
NameName of the Collector Profile.
StatusDisplays the status of the collector profile:
  • Not Installed
  • Disconnected: It displays the time (in days, hours, and minutes) it has been in the disconnected status.
  • Connected: It displays the time (in days, hours, and minutes) the gateway is connected.
Gateway Resource NameName of the gateway.
TypeType of gateway: NextGen, Classic, or Windows.
Installed AppsNumber of Apps or Integrations that are installed.
Discovery ProfilesNumber of mapped Discovery Profiles.
Managed ResourcesNumber of resources that are managed by the gateway.
VersionCurrent gateway version.
Update StateIndicates the state of the gateway: Whether an update is available for the gateway, In-progress, Scheduled, or Up-to-date.
Update StatusStatus of the gateway: In Progress, Success.
SIP AgentClick the toggle button to enable or disable the SIP Agent.
Synthetics AgentClick the toggle button to enable or disable the Synthetics Agent.
Model NumberModel number of installed gateways.
(Example: Classic gateway model number starts with OG, NextGen starts with ONG, Windows starts with OWG).
NamespaceAll NextGen Gateways show the Kubernetes namespace in which the gateway is deployed.
For Classic and Windows Gateways, this field displays N/A.
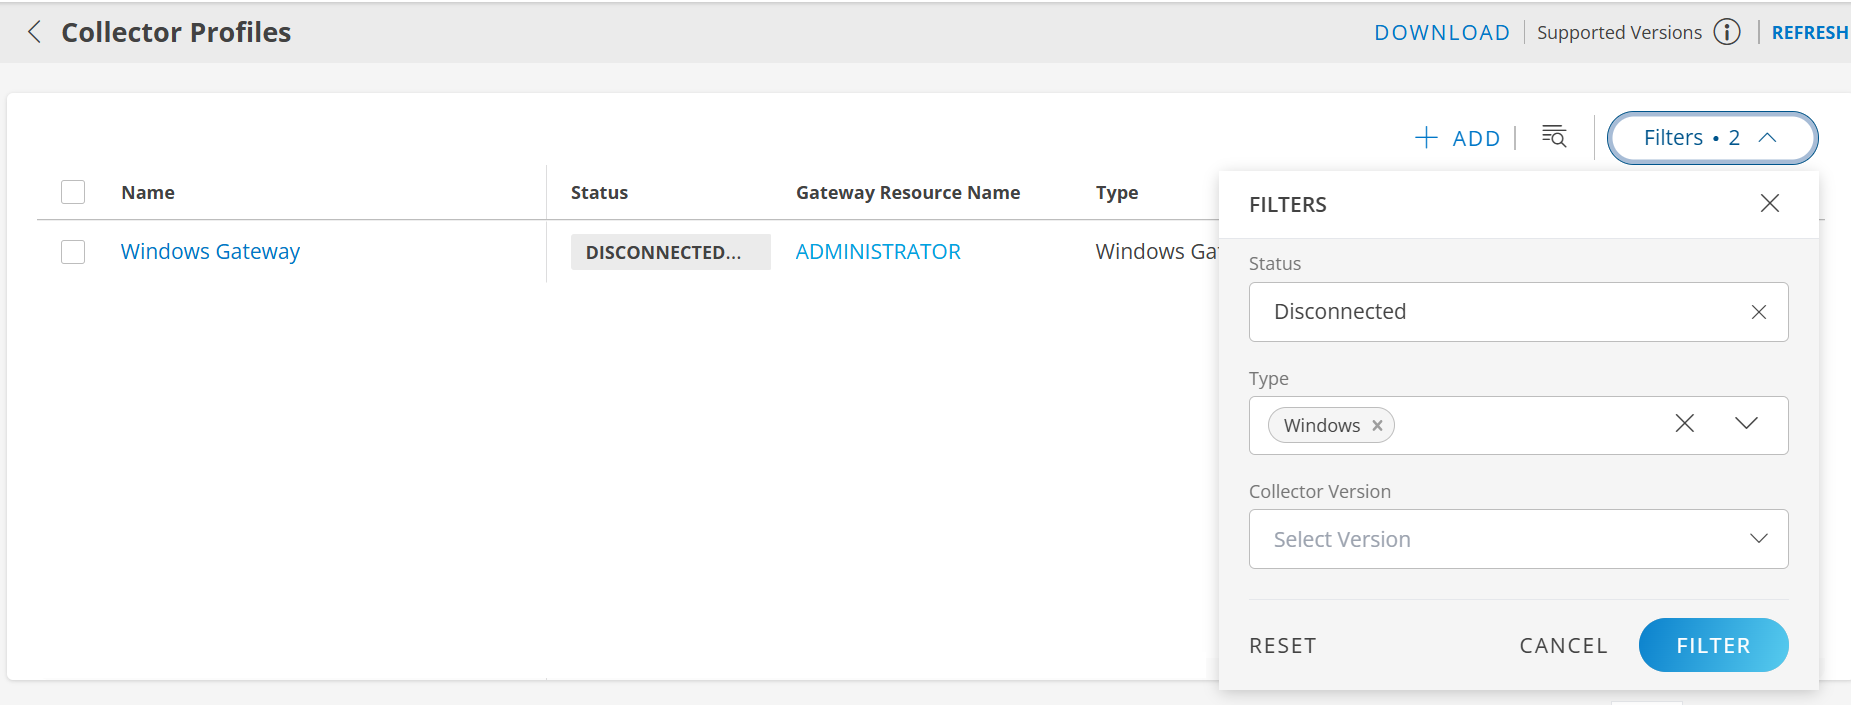
Filter

You can use the Filter option to narrow down search results.

  1. Navigate to Setup > Account. The Account Details page is displayed.
  2. Click the Collector Profiles tile. A list of collector profiles is displayed.
  3. Click Filter option.
  4. Select Status, Type, and Collector Version from the dropdowns.
  5. Click FILTER. The search result is displayed.

    Collector Profiles - Filter

Actions on a collector profile

ActionDescription
RenameTo rename a collector profile:
  1. Search for the collector profile.
  2. Hover over the row and click the action menu (three dots).
  3. Select Rename.
  4. Enter a name and click Rename.
DetachTo detach a collector profile:
  1. Search for the collector profile.
  2. Hover over the row and click the action menu (three dots).
  3. Select Detach. A confirmation message appears, "The detach gateway will disconnect from the OpsRamp and stop monitoring the resources. The gateway will be reset to factory defaults."
  4. Click Detach.
ReinstallTo reinstall a collector profile:
  1. Search for the collector profile.
  2. Hover over the row and click the action menu (three dots).
  3. Select Reinstall. A confirmation popup appears.
  4. Click Install. Follow the instructions to install and register the gateway.
RemoveTo remove a collector profile:
  1. Search for the collector profile.
  2. Hover over the row and click the action menu (three dots).
  3. Select Remove. A confirmation popup appears. The Gateway Collector profile will not be deleted if the profile has Installed App, Discovery Profiles, or Managed Resources.
    Note: The Remove button is disabled, if there are installed apps, discovery profiles, or managed resources.
  4. Click Remove.
Scale UpScale Up is available only for Elastic type collector profile.
To scale up:
  1. Search for the collector profile.
  2. Hover over the row and click the action menu (three dots).
  3. Select Scale Up. A confirmation popup appears, "The Scale Up action will create one more gateway child profile, and this action will increase the capacity of the gateway profile. You need to run Re-balance after doing the Scale Up action to distribute the load equally."
  4. Click Scale Up.
Reconnect TunnelTo reconnect tunnel:
  1. Search for the collector profile.
  2. Hover over the row and click the action menu (three dots).
  3. Select Reconnect Tunnel. A confirmation popup appears, "Reconnecting the tunnel will cut off the current connection and start it up again. The gateway will be disconnected and monitoring will stop for a short while during this operation."
  4. Click Reconnect Tunnel.
UpgradeNote:
  • You can upgrade a gateway version to the latest available version.
  • You can upgrade a gateway that is in either the Connected or Disconnected status.
  • You can upgrade a gateway to the latest available version (n), the previous version (n-1), or the version before that
    (n-2).
To upgrade a gateway version:
  1. Search for the collector profile.
  2. Hover over the row and click the action menu (three dots).
  3. Select Upgrade.
    Alternatively, you can select the collector profile and click Actions > Upgrade. The Upgrade Gateway Version window is displayed.

    Upgrade Gateway version window
  4. Select a version you want the gateway to be upgraded to, from the dropdown.
You can upgrade the gateway version either immediately or on a scheduled basis.
To upgrade the gateway version directly:
  1. Select the collector profile and click Upgrade.
  2. Note:
    • Pre-upgrade checks are done to verify if the gateway is eligible for an upgrade.
    • The checks are not available for some lower gateway versions.
    The Pre-Upgrade Check Status column shows Skipped if there are no checks available for the current gateway version.
To upgrade the gateway version on a scheduled basis:
  1. Select the Upgrade on Schedule checkbox.
  2. Select the date and time on which you want to upgrade the gateway version.
  3. Click Apply.
  4. Click Upgrade.
The upgrade process starts and the Update Status changes to In_Progress.
Note: The Upgrade on Schedule functionality works for Gateway version 21.0.0 and above.

Bulk Upgrade: You can bulk upgrade gateways which are of same gateway type and model. To bulk upgrade:
  1. Select the collector profiles you want to upgrade.
  2. Click Actions > Upgrade. The Upgrade Gateway Version window is displayed.

  3. Bulk Upgrade Gateway version
  4. Select the profiles and click Upgrade.
An error message is displayed, if you select multiple profiles with mixed gateway type and model.
Note: If the profile has the latest gateway version, the Upgrade option will not be available in the Actions menu.
Reboot GatewayTo reboot the gateway:
  1. Search for the collector profile.
  2. Hover over the row and click the action menu (three dots).
  3. Select Reboot Gateway. A confirmation popup appears.
  4. Click Reboot Gateway. The gateway is restarted.
Reset PasswordTo reset the gateway password:
  1. Search for the collector profile.
  2. Hover over the row and click the action menu (three dots).
  3. Select Reset Password. A confirmation popup appears.
  4. Click Reset Password. The gateway password is set to default password.
Copy IdTo copy gateway UUID:
  1. Search for the collector profile.
  2. Hover over the row and click the action menu (three dots).
  3. Select Copy Id. A confirmation popup appears, ID copied successfully.
The gateway UUID is copied to the clipboard.